
Calling a web API and saving the result for further analysis is a common scenario for Data Engineers. Microsoft Fabric brings together many capabilities into a unified platform and we have several ways to query and store data from APIs within Fabric.
In this lab we are going to use Notebooks and PySpark to load data from a REST API and store the result in a Delta Table.
The steps in this guide are:
- Create your Notebook (and Lakehouse link)
- Call the API using PySpark
- Transform the JSON response to a Data Frame
- Write the Data Frame to a Delta Table
Prerequisites
For this lab you need a Fabric Capacity. If you do not yet have one you can sign up for a free trial.
We also need an API endpoint that returns some data. Reqres public REST API is free and easy to use. The response from the API will be in JSON format.
Step 1 – Create your Notebook (and Lakehouse link)
The Notebook will be where we execute all of the commands necessary to query the API and store the data.
After the Notebook is created Fabric will have a PySpark engine (+ other engines as needed) ready to execute our code. PySpark has libraries that will help us connect and process the response from the API.
Create a Notebook:
- Go to your Fabric Capacity by signing in with your Microsoft account at https://app.fabric.microsoft.com/ (trail available as of March 2024).
- Click Workspaces and select or create one.
- In the Workspace press “+ New” and select Notebook.

Before we can continue we need to establish a link to a Lakehouse within our Workspace. Considering the capabilities of the Lakehouse architecture it is pretty amazing that one can be created just as easily as the notebook above.
To link (or create) a Lakehouse with the Notebook:
- Click Lakehouses on the left hand side of your Notebook code block.
- Press “Add” and add an existing, or create a new, Lakehouse.

The Notebook is now ready to run PySpark code and store data into the Lakehouse we linked to the Notebook.
Step 2 – Call the API using PySpark
The API has several requests we can make but we will only make a request for a list of users. This list will later be converted into a table and stored in our Lakehouse.
Your Notebook can be divided into separate code blocks. Add the code below to the block we already have:
## API Call ##

import requests

url = 'https://reqres.in/api/users?page=2'

# Making a GET request
response = requests.get(url)

# Process the response data (which is usually JSON)
data = response.json()

print(data)
After pressing the “Play” button next to your code block the output should look like the picture below. This means the API call worked and we are receiving user data in JSON format.

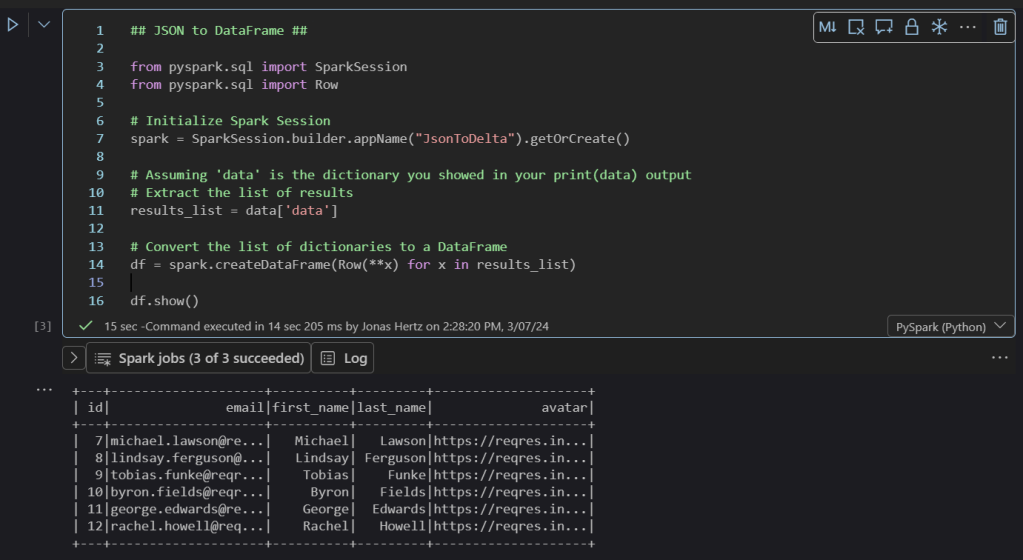
Step 3 – Transform the JSON response to a Data Frame
The user data we extracted from the API is Semi Structured and we can store it in the current raw output as a text (JSON) or binary file. But to harness the full power of Fabric we want to store the data in a Delta Table!
In PySpark a Data Frame is a collection of data grouped into named columns and rows. By converting the raw output into this Structured format we can easily store it in a Delta Table.
Add the following code to a new block in your Notebook:
## JSON to DataFrame ##

from pyspark.sql import SparkSession
from pyspark.sql import Row

# Initialize Spark Session
spark = SparkSession.builder.appName("JsonToDelta").getOrCreate()

# Assuming 'data' is the dictionary you showed in your print(data) output
# Extract the list of results
results_list = data['data']

# Convert the list of dictionaries to a DataFrame
df = spark.createDataFrame(Row(**x) for x in results_list)

df.show()
After pressing “Play” we see that the data in the “data” section of the JSON file has been stored into a Data Frame and is now structured:
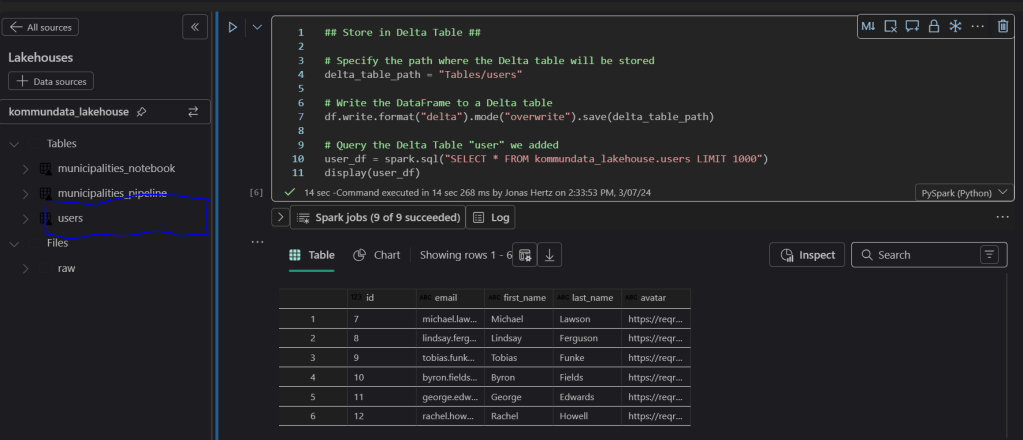
Step 4 – Write the Data Frame to a Delta Table
The final step is short and only requires us to define the table name, format and mode (overwrite append etc.).
(Note that at time of writing (March 2024) Fabric does not support sub folders in the lakehouse. Because of this Tables/<tablename> is our only option for the table path.)
Copy the following code to your Notebook:
## Store in Delta Table ##

# Specify the path where the Delta table will be stored
delta_table_path = "Tables/users"

# Write the DataFrame to a Delta table
df.write.format("delta").mode("overwrite").save(delta_table_path)

# Query the Delta Table "user" we added
user_df = spark.sql("SELECT * FROM kommundata_lakehouse.users LIMIT 1000")
display(user_df)
After pressing play go to the Lakehouse menu to the right and click the three dots (…) followed by “refresh”.
Your user table should now be visible under Tables and the final query in your code block should return the user table from the Lakehouse.
Conclusion
We have created a simple test in Fabric that reads data from a REST API and stores the result in a Delta Table in a Lakehouse.
Even though the example above is very simple to execute don’t be fooled! Under the hood Fabric uses technologies for storing and processing the data that can be scaled up to process vast amounts of data or, I must add, small amounts of data at low costs.
